Distributing Notebooks#
The Guide has moved!
The information on this website may be outdated as of July 2025. Please view the new curriculum guide located at https://curriculum-guide.datahub.berkeley.edu/
We recommend using interact links to distribute notebooks to students. nbgitpuller links are described in detail below. If you do not wish to use interact links, you can distribute assignments through bCourses as well. In this case, after you have uploaded the files to bCourses, students will need to download them and then upload them to their own JupyterHub accounts.
The Steps#
Here are the basic steps you will need to go through to distribute notebooks and other files. To learn more about the details of the process, please read through the rest of this page.
Create a folder with all files for the assignment (notebook, datasets, etc.)
Generate an interact link for the folder using the interact link generator (more on this below)
Distribute the link to students through some web page
What are interact links?#
nbgitpuller links simplify the assignment distribution process. Rather than downloading files from an external source and then uploading to their personal JupyterHub accounts, users can obtain all files for a given assignment with just one click. When a user clicks on an interact link for a particular assignment, all files for the assignment will show up in the user’s personal JupyterHub account.
These links can be used with any content stored on GitHub in a public repository. nbgitpuller links can be generated for an entire repository, or a particular file or folder. When a link is clicked, a series of Git commands are run from the user’s JupyterHub account, which is why interact links must be used with content on GitHub. They cannot be used to pull arbitrary files from sources other than GitHub.
Using these links enables users to immediately interact with publicly available content on GitHub. This is valuable for easy assignment distribution, but also in the broader context of using the open-source content that is available on GitHub. Learning Git is no longer a barrier to interacting with this content.
How do interact links work?#
Here is an interact link with the various components highlighted in different colors. The grey portions of the link are needed for formatting and will remain the same for each links. The colored portions will be different for each link. If you are new to GitHub you may want to familiarize yourself with the basics (repositories, branches, etc.) to better understand each component.

The above link does the following:
Clones the repo
ds-modules/SW-282into the user’s account onhttps://datahub.berkeley.eduChecks out to the
masterbranch (this is the default, but specifiable on nbgitpuller)Opens the file
lab04/lab04.ipynbondatahub.berkeley.edu. The full path of this file on the user’s JupyterHub account would be~/SW-282/lab04/lab04.ipynb.
Restrictions#
To use an interact link, files must be stored in a public GitHub repo. nbgitpuller links will not work with private repositories. Previously, content had to be stored in the data-8 GitHub organization or in an approved account or organization. This no longer applies, interact links can be used with content stored in ANY public repository.
nbgitpuller Link Generator#
nbgitpuller links can be manually created in the format shown above, or can be automatically generated using this tool. The interact link generator tool allows users to specify a JupyterHub URL and GitHub url as inputs. The tool will generate an interact link for the specified GitHub content and JupyterHub.
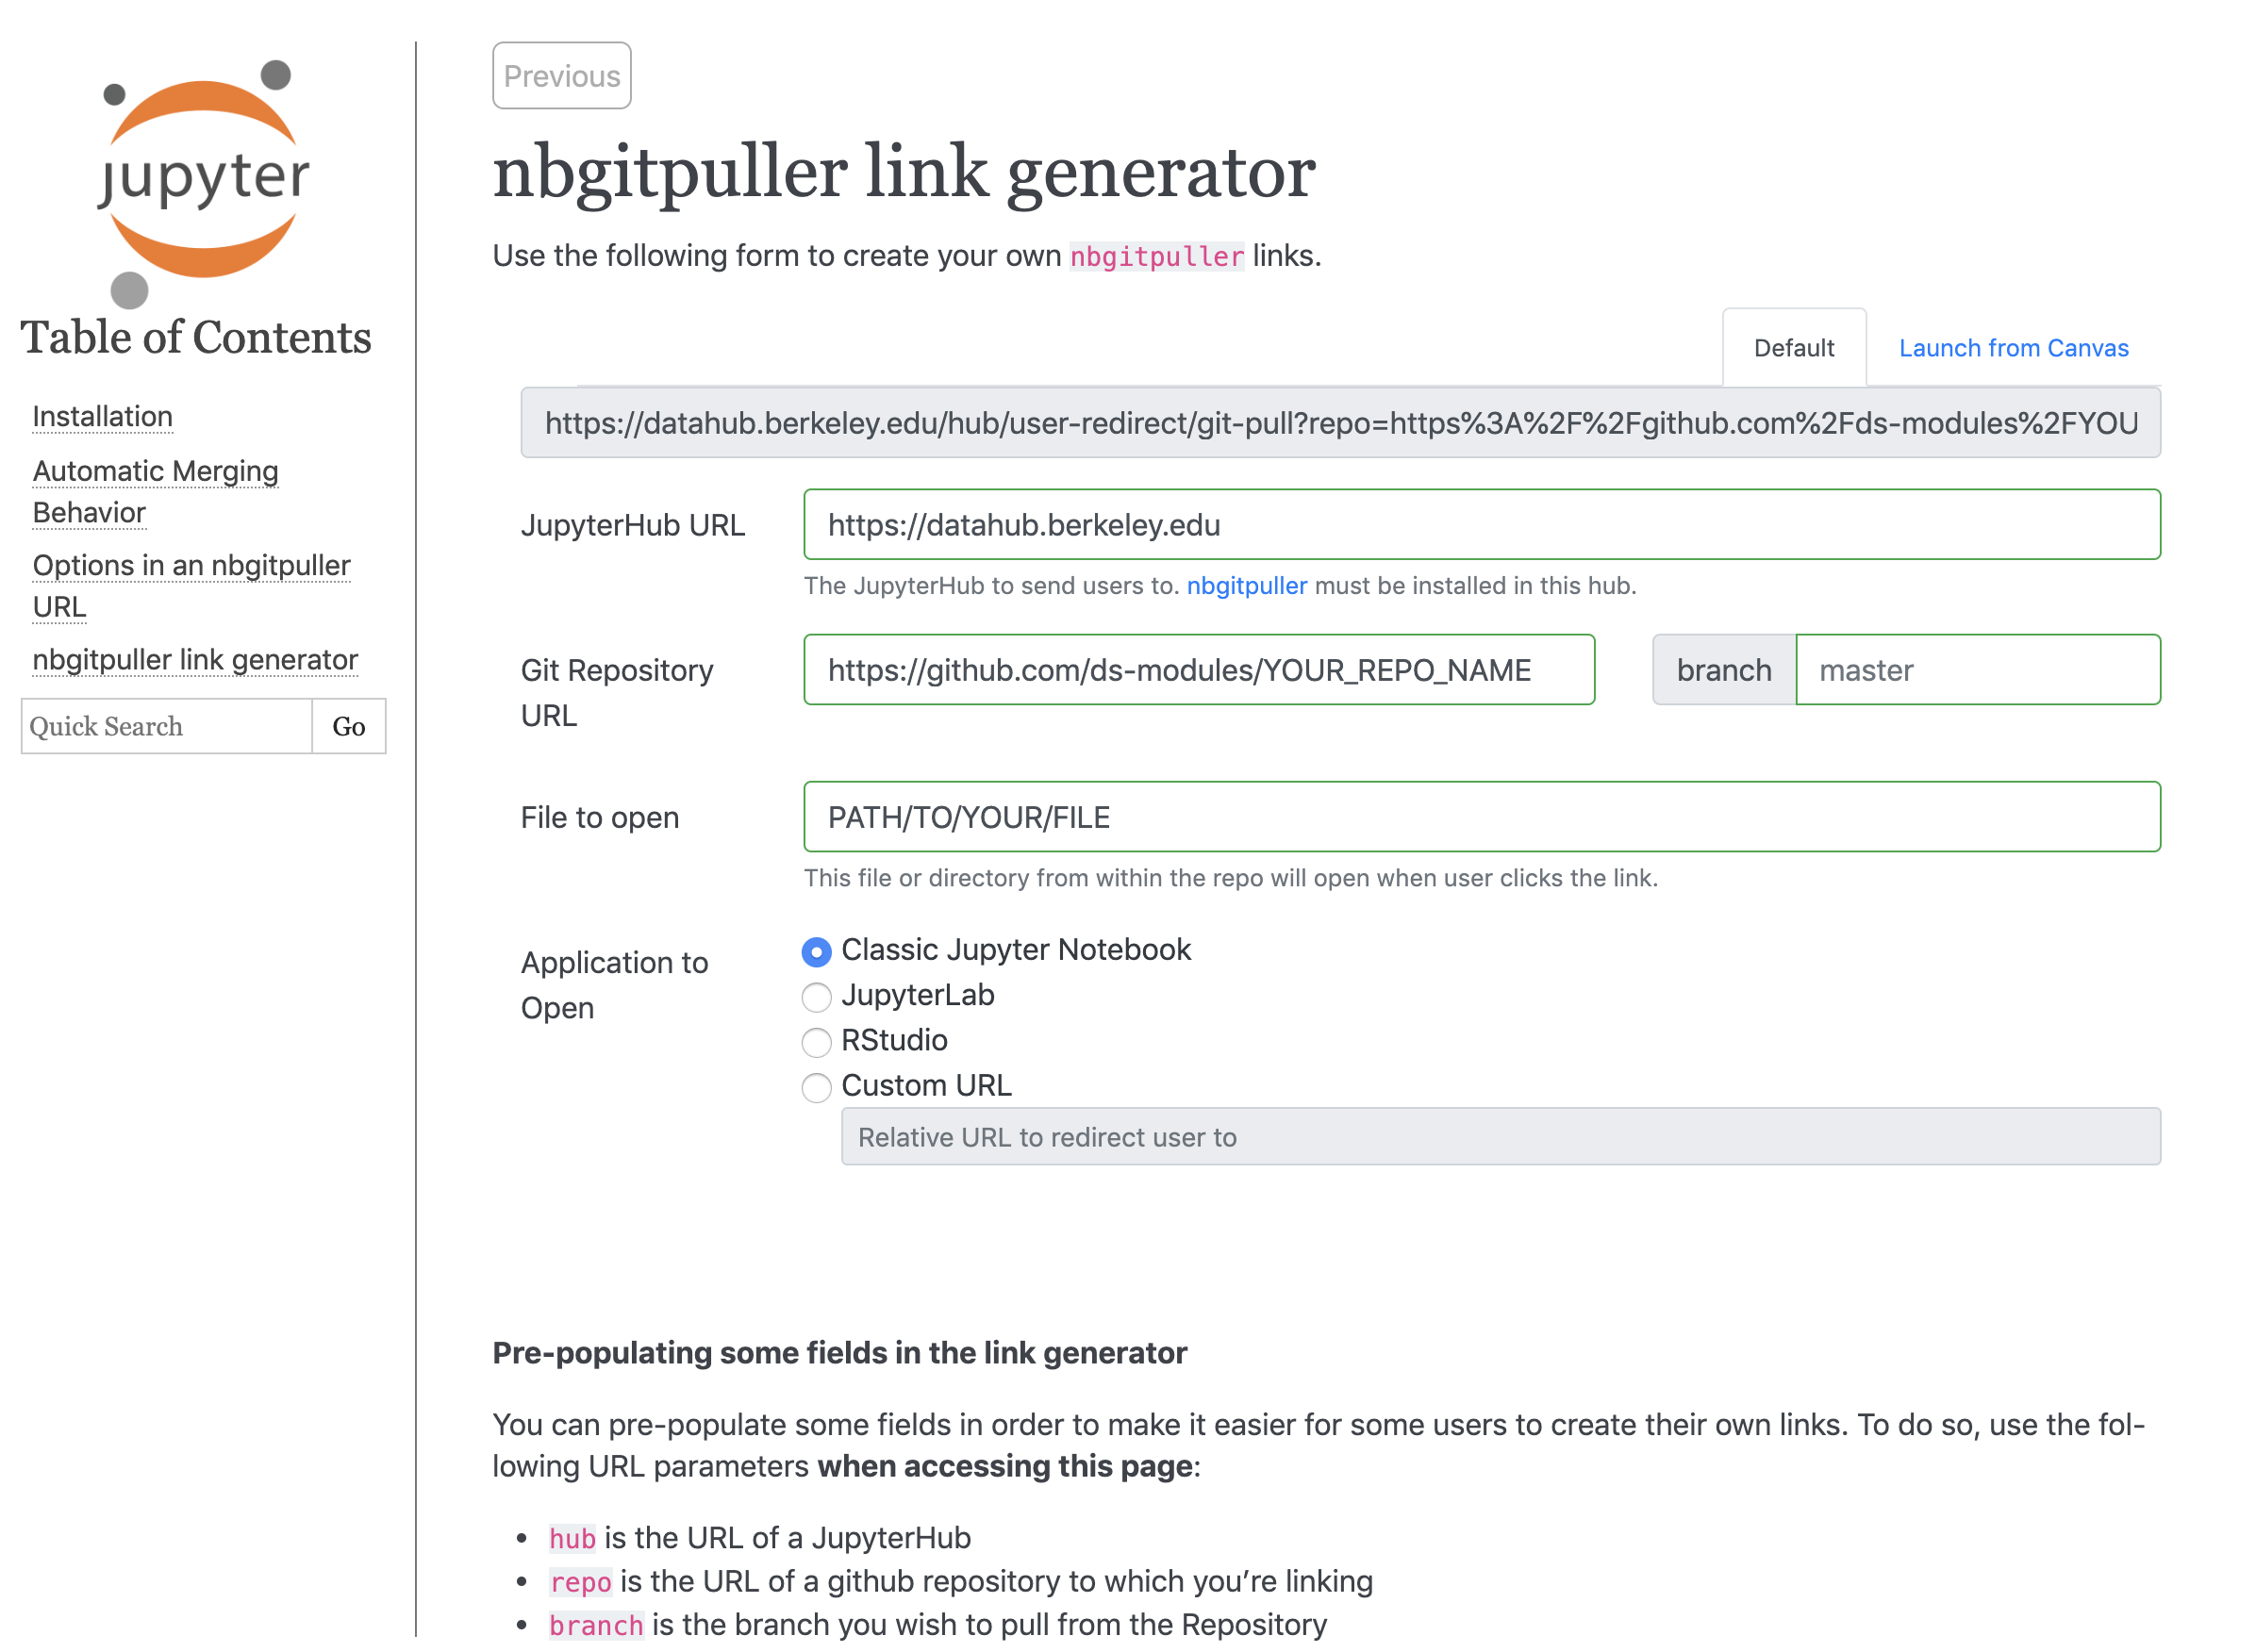
For example, to pull this repo into DataHub, we would fill out the nbgitpuller link generator with:
Fill in the JupyterHub URL field with
https://datahub.berkeley.eduPaste the GitHub URL to the repo in the Git Repository URL field:
https://github.com/ds-modules/SW-282Leave the Branch field blank, because it defaults to
masterFill in the File to Open field with the path to the file:
lab04/lab04.ipynb
After finishing these steps, the link in the grey text box will be your interact link. Note that the link to the link generator above will pre-fill the JupyterHub URL and GitHub URL fields, but it will not paste in the repo, so you will need to add the name of the repo to the GitHub URL field, as well as fill in the (optional) branch and file path fields.
Important Note#
The technology behind interact links, called nbgitpuller, pulls all files from a repo into the user’s DataHub account. This means that you should not store unfinished materials and answer keys in the same repo as published assignments. Any interact link for a published assignment would also distribute the unfinished materials and answer keys to the students, which you probably do not want. Instead, we recommend that you use a public repo for published assignments and a private repo for unfinished materials and answer keys.
Datahub Link Generator Chrome Extension#
The most recent addition to the nbgitpuller link generator is the Datahub Link Generator extension. This extension streamlines the process of creating shareable links and is tailored specifically for UC Berkeley instructors, as seen in the Berkeley-specific version of the nbgitpuller link generator.
Install the Datahub Link Generator Chrome Extension:#
Visit the Datahub link generator Chrome extension’s webpage. Click the “Add to Chrome” button to install the extension.
Click “Add extension” button when prompted. You’ll receive a notification confirming that the extension has been added to your browser
Access the Extension:#
After installation, look for the puzzle piece icon in the upper-right corner of your Chrome tab.
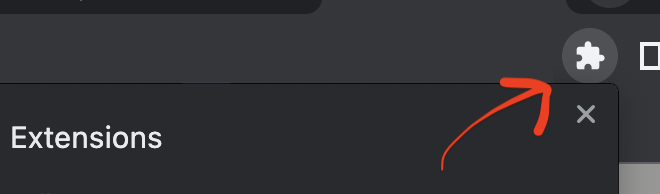
Fig. 18 Click puzzle piece icon#
Click on the pin button to make sure the extension stays pinned at the top of the screen.

Fig. 19 Pin extension#
The extension appears on the browser like the snapshot below,
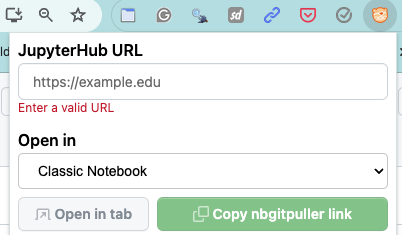
Fig. 20 Show installed extension#
Creating the nbgitpuller Link:#
Access a Github repository containing notebooks in Python/R
Open your assignment from a respective Github repo
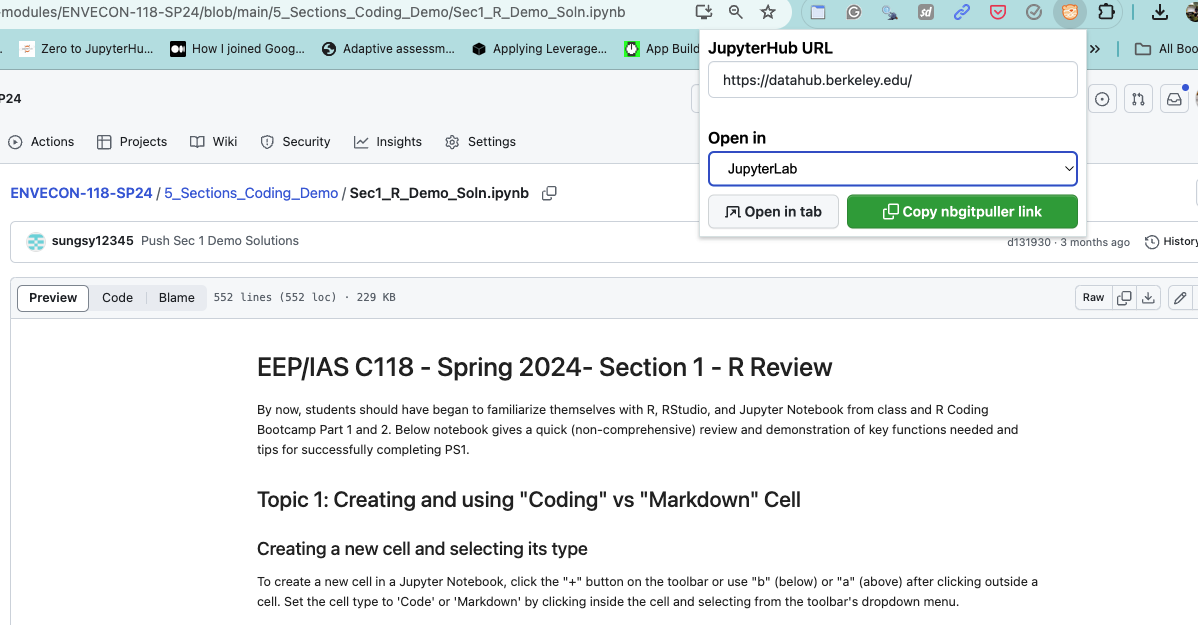
Fig. 21 Open a notebook from github repo#
Select the link generator extensions icon in the top right part of the browser (closer to URL section)
Paste your Datahub URL (if you are using the main Datahub then you can use https://datahub.berkeley.edu/) in the “JupyterHub URL” textbox
Choose the appropriate option from the “Open in” dropdown list:
If you want your students to access a Jupyter notebook interface which is simple and intuitive to use, Select “Classic Notebook” option from the dropdown list
If you want them to explore more advanced features including 3rd party plugins from Jupyter ecosystem, Select “JuptyterLab” option from the dropdown list
If you want your students to work on a R based assignment, Select “RStudio” option from the dropdown list
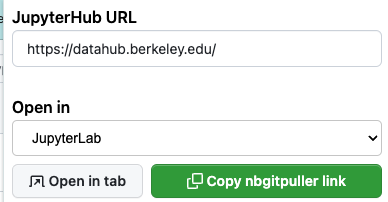
Fig. 22 Icon showing the Datahub-link-generator extension#
As a last step, Select “Copy nbgitpuller link” button which generates a shareable link that opens your assignment in the choosen interface or “Open in tab” button which opens the notebook in a new tab.