Accessing Elevated Privileges in a Hub#
The Guide has moved!
The information on this website may be outdated as of July 2025. Please view the new curriculum guide located at https://curriculum-guide.datahub.berkeley.edu/
What does elevated privilege in an hub mean?
Elevated privilege provides the necessary features required to troubleshoot students notebook interface in the hub. If you are an admin user, you can do the following,
You can start and stop the students’ server in your dedicated hub
You can access the student server to debug issues in their notebook
Warning
Elevated privileges are hub-wide. If you have a GSI teaching your course using a particular hub but is acting as a student in another course which uses the same hub, then this can result in a conflict of interest. Please report such scenarios to the infrastructure team so that we can take the necessary corrective action.
Check this image to know your privileges for the admin option,

Fig. 27 Here is how the admin dashboard looks like!#
How do I get elevated privileges?
We generally recommend the teaching team alone to have elevated privileges in the hubs they use for the instructional purposes. If you satisfy the above criteria, please create a request using this template.The infrastructure team will assist in the process of assigning elevated privileges to the instructors.
Note
This process has undergone a major change. You no longer need to provide the list of usernames for the staff who require admin access. You just need to provide the bcourses ID for all the courses for which you require admin access.
To assign elevated privileges to a set of people other than all course staff, for example a subset of them, please do the following:
In order to assign people to a group, they must have the role of “student”. By default, course staff are either “teacher” or “ta”, but they can be assigned more than one role. Visit the
Peoplesection and click+ People. Specify the users’ email addresses and make sure the Role is set toStudent.Create a bcourses group. The first step will be to create a groupset and then create a group inside it. For example, you can title the groupset “Staff Groups” and the group “Hub Admins”.
Share the bcourses ID in the Github template. The admins will make changes to the Datahub configuration to enable this feature. If you are assigning privileges to a group of people other than course staff, specify this in the Github issue.
Once elevated privileges are assigned to jupyterhub groups based on the Datahub documentation, the people being granted those privileges will need to logout of the hub and then log in again for the config changes to persist. This is not the same thing as stopping and starting the server – users need to click “Logout”.
You will be able to access the admin interface in the UI by navigating to “
/hub/admin” and check for the admin status of varied users. You will also be able to use the “Manage groups” option in the admin interface to check the bcourses id of courses with admin privileges. Sometimes, users in your course might not be listed as part of the admin interface. During those circumstances, it is recommended that those users log out of the hub and then log back in. It might take sometime for those users to be listed as part of your admin view.
Note
If you need any help during this process of creating bcourses groups, please reach out to bcourseshelp@berkeley.edu. Please keep in mind that the bcourses page for the course should be published so that users requiring elevated privileges actually have the required access.
How do I navigate to the admin portal?
Please follow the steps below to navigate admin interface,
Login to your hub instance
Click the admin option from the top bar

Fig. 28 Here is where you can find admin option!#
Once you click, you have access to instances of users and admins in that specific hub
Note
If you are using the R hub, then you may need to follow the below steps,
You can replace https://r-staging.datahub.berkeley.edu/user/your-calnet-id/rstudio/ with https://r-staging.datahub.berkeley.edu/hub/admin to access the admin interface.
You can use https://r-staging.datahub.berkeley.edu/hub/home to restart your server.
How do I start a student server?
Click on the control panel

Fig. 29 Here is how the control panel option looks like!#
Click admin option
Fig. 30 Here is where you can find admin option!#
Find the user whose server you want to restart.

Fig. 31 Here is how to search for an user!#
Click restart server option
How do I stop a student server?
Click the control panel option
Click admin option
Find the user whose server you want to stop.
Click stop server option
How can I access the instance of a student server?
Click the control panel option
Click admin option
Search the calnet id of the student’s instance you want to access
Click access server option to access student’s instance
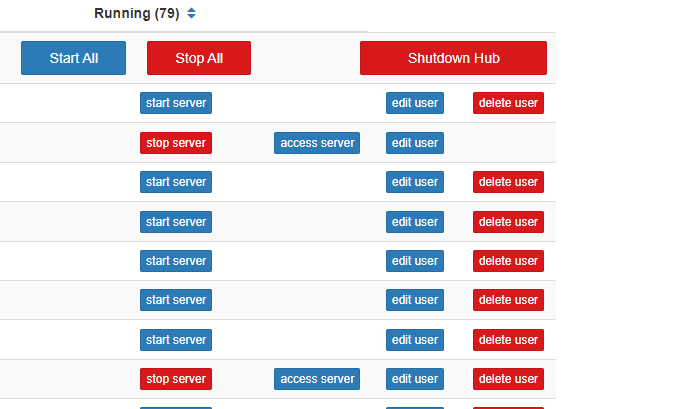
Fig. 32 Here is how to access a server’s instance!#