# Initialize Otter
import otter
grader = otter.Notebook("bond_polarity.ipynb")
Identifying Polar and Non-Polar Bonds
Created and developed by Suparna Kompalli and Brandon Concepcion, with assistance and supervision by Jonathan Ferrari, Professor Darcie McClelland, and Professor Eric Van Dusen as part of our work with UC Berkeley’s College of Computing, Data Science and Society as well as El Camino College
Bond Polarity
Welcome! In this assignment, we will explore the concept of chemical bonding, focusing on how to determine whether a bond is polar or non-polar. Understanding the nature of these bonds is crucial in chemistry as it influences the physical properties and behavior of molecules. We will also delve into identifying the specific bonds that make up different molecules, helping to develop a deeper understanding of molecular structure and its implications on molecular interactions.
By the end of this assignment, you will be equipped with the knowledge to analyze and classify bonds in various compounds based on their polarity and the types of atomic interactions that hold them together.
Start by running the cell below to import our neccessary libraries!
obscure_packages = ["py3Dmol", "rdkit"]

for pkg in obscure_packages:
    try:
        __import__(pkg)  # check if installed
    except ImportError:
        print(f":warning: {pkg} not found. Installing...")
        !pip install {pkg}
        __import__(pkg)

from utils import *
import pandas as pd
from rdkit import Chem
from rdkit.Chem import AllChem
from rdkit.Chem import Draw
import ipywidgets as widgets
from IPython.display import display
import io
from ipywidgets import interact
import rdkit.Chem.rdCoordGen as rdCoordGen
import py3Dmol as pm
import rdkit
from rdkit.Chem import rdchem

df = pd.read_csv("properties.csv")

def draw_molecules(lst):
    elements = []
    for molecule in lst:
        m = Chem.MolFromSmiles(molecule)
        img = Draw.MolToImage(m)
        img_byte_array = io.BytesIO()
        img.save(img_byte_array, format='PNG')
        img_byte_array.seek(0)
        elements.append(widgets.Image(value=img_byte_array.read(), format='png'))
    row = widgets.HBox(elements)
    display(row)
Section 1: Understanding Molecules
Let’s explore some molecules to better understand their composition. In this exercise, we’ll see how visualizations can help us gain deeper insights into chemical structures and reactions.
It’s incredible to think that just a few hundred years ago, visualizing molecules like ethanol would have been thought of as impossible without. Thanks to modern computational tools like RDKit and py3Dmol, we can now generate and manipulate 2D and 3D representations of chemical structures efficiently!
Run the cell below. Please do not modify any of the lines—this cell has been pre-written to generate a specific visualization you’ll use to answer the following questions.
draw_molecules(['CCO'])We can transition Ethanol to Acetic Acid (the main component of vinegar) by oxiding the ethanol-- a chemical process in which ethanol loses electrons and gains oxygen. This oxidation typically occurs in two steps:
First, Ethanol (C₂H₅OH) is oxidized to acetaldehyde (CH₃CHO) by an oxidizing agent such as potassium dichromate (K₂Cr₂O₇) or any mild oxidizer. In this step, ethanol loses two electrons and one hydrogen atom (oxidized), forming acetaldehyde.
Acetaldehyde (CH₃CHO) is further oxidized to acetic acid (CH₃COOH). This is typically achieved by further oxidation using stronger oxidizers.
Converting ethanol to acetic acid requires two stages of oxidation: the first transforms ethanol into acetaldehyde, and the second further oxidizes acetaldehyde into acetic acid. We can further describe the process by using the table below:
| Step | Molecule | Formula | Description |
|---|---|---|---|
| 1 | Ethanol | C₂H₅OH | Starting alcohol |
| ↓ | Oxidation | (loss of H, gain of O) | |
| 2 | Acetaldehyde | CH₃CHO | Intermediate aldehyde |
| ↓ | Oxidation | (further oxidation) | |
| 3 | Acetic Acid | CH₃COOH | Final carboxylic acid product |
Let’s try and visualize this transition!
Run the cell below. Please do not modify any of the lines—this cell has been pre-written to generate a specific visualization you’ll use to answer the following questions.
draw_molecules(['CCO', 'C=O', 'CC(=O)O'])Question 1.1: How many hydrogen bonds are in Ethanol?
Type your answer here, replacing this text.
Question 1.2: How many hydrogen bonds are in Acetic Acid?
Type your answer here, replacing this text.
Section 2: Building Molecules
We’ll begin our journey by learning how to construct the water molecule (H₂O). We’ll promptly move to other examples later.
The first step is to create an instance of a molecule. This is something we’ll need to do each time we want to build a new molecule from scratch.
Run the cell below to initialize the structure of the water molecule.
h2o_molecule = Chem.RWMol()Now it’s time to add atoms to our molecule! To do this, we first create an instance of the atom we want to include, and then we add it to our molecule.
Let’s start by adding an oxygen atom
oxygen = Chem.Atom(8)
oxygen_index = h2o_molecule.AddAtom(oxygen)
We begin by creating an element instance using the Chem.Atom() method, which takes the atomic number (i.e., number of protons/electrons) as an argument. Since oxygen has an atomic number of 8, we pass in the number 8 to represent it. After creating the atom, we add it to the molecule we initialized earlier.
Question 2.1: Use the cell below to add the rest of the atoms needed to build H2O.
Hint: Follow the example in the cell above.
hydrogen1 = ...
hydrogen1_index = ...

hydrogen2 = ...
hydrogen2_index = ...grader.check("q21")We have our atoms, but they aren’t connected yet! Let’s go ahead and add the necessary bonds to complete the structure of our molecule.
Question 2.2: Fill in the cell below to visualize our final H2O molecule.
h2o_molecule.AddBond(oxygen_index, hydrogen1_index, Chem.BondType.SINGLE)
h2o_molecule.AddBond(oxygen_index, ..., ...)
Chem.Draw.MolToImage(h2o_molecule)grader.check("q21")Question 2.3: Using the example above, fill in the cell below to create a molecule of your choice! In the answer box below, describe the molecule you selected, why you chose it, and how you used RDKit to visualize it. Be sure to explain your reasoning and approach!
molecule = Chem.RWMol()

# YOUR WORK HERE

Draw.MolToImage(molecule)
Section 3: Polar and Nonpolar Bonds
Chemical bonds form the foundation of molecules, determining their shape, interactions, and function in biological and chemical systems. In this section of the notebook, we will explore two fundamental types of covalent bonds: polar bonds and non-polar bonds. To understand this process a bit better, let’s refer to the following analogy
Tug of War
Imagine it’s a scorching summer afternoon and you and your friend are locked in an intense game of tug-of-war. The rope stretches taut between you, perfectly balanced. Neither side is able to overpower the other. Since you both have the same strength and the same determination, for now it remains a fair fight.
If we swap out the rope for electrons, and the players for atoms—suddenly, you’re looking at the fundamental nature of covalent chemical bonding.
Playing Fair
Now let’s consider the case where you and your friend are equally strong. We wouldn’t expect the rope to move much if at all. This is exactly what happens in non-polar covalent bonds. When two atoms have equal or nearly equal electronegativities, they share electrons relatively evenly.
Examples of this include:
O₂ (oxygen gas)
N₂ (nitrogen gas)
CH₄ (methane)
Since non-polar molecules have no distinct positive or negative sides, they tend to be hydrophobic (water-fearing) and don’t dissolve well in water. Think of how oil and water don’t mix—oil is made of non-polar molecules that refuse to interact with water.
“Hitting” the Gym
Now imagine that this friend of yours has been hitting the gym, where their forearms and back have grown massive. When y’all play tug of war again, they easily pull the rope toward themselves, making the game unfair. This kind of scenario happens in polar covalent bonds, where for specific molecules, one atom is significantly more electronegative than the other. Thus, it yanks more on the shared electrons, bringing them closer.
This uneven sharing creates partial charges:
The stronger atom (which pulls electrons closer) gets a partial negative charge (δ⁻)
The weaker atom (which loses some electron density) gets a partial positive charge (δ⁺)
This is why molecules like water (H₂O) are polar. Oxygen is electronegative and pulls the electrons away from hydrogen, making it slightly negative (δ⁻) and leaving the hydrogens slightly positive (δ⁺).
Some other examples of polar molecules include:
H₂O (water)
NH₃ (ammonia)
CO (carbon monoxide)
Since polar molecules have distinct positive and negative sides, they are hydrophilic (water-loving) and dissolve easily in water. This is why salt and sugar dissolve in water, but oil does not.
Electronegativity
Below we reference Dr. Scott’s simplifed table of electronegativity values for the elements in the periodic table. You’ll notice that the noble gases typically have no listed electronegativity values. This is because they already possess a full valence shell (octet) and, in most cases, do not need to form bonds with other elements.
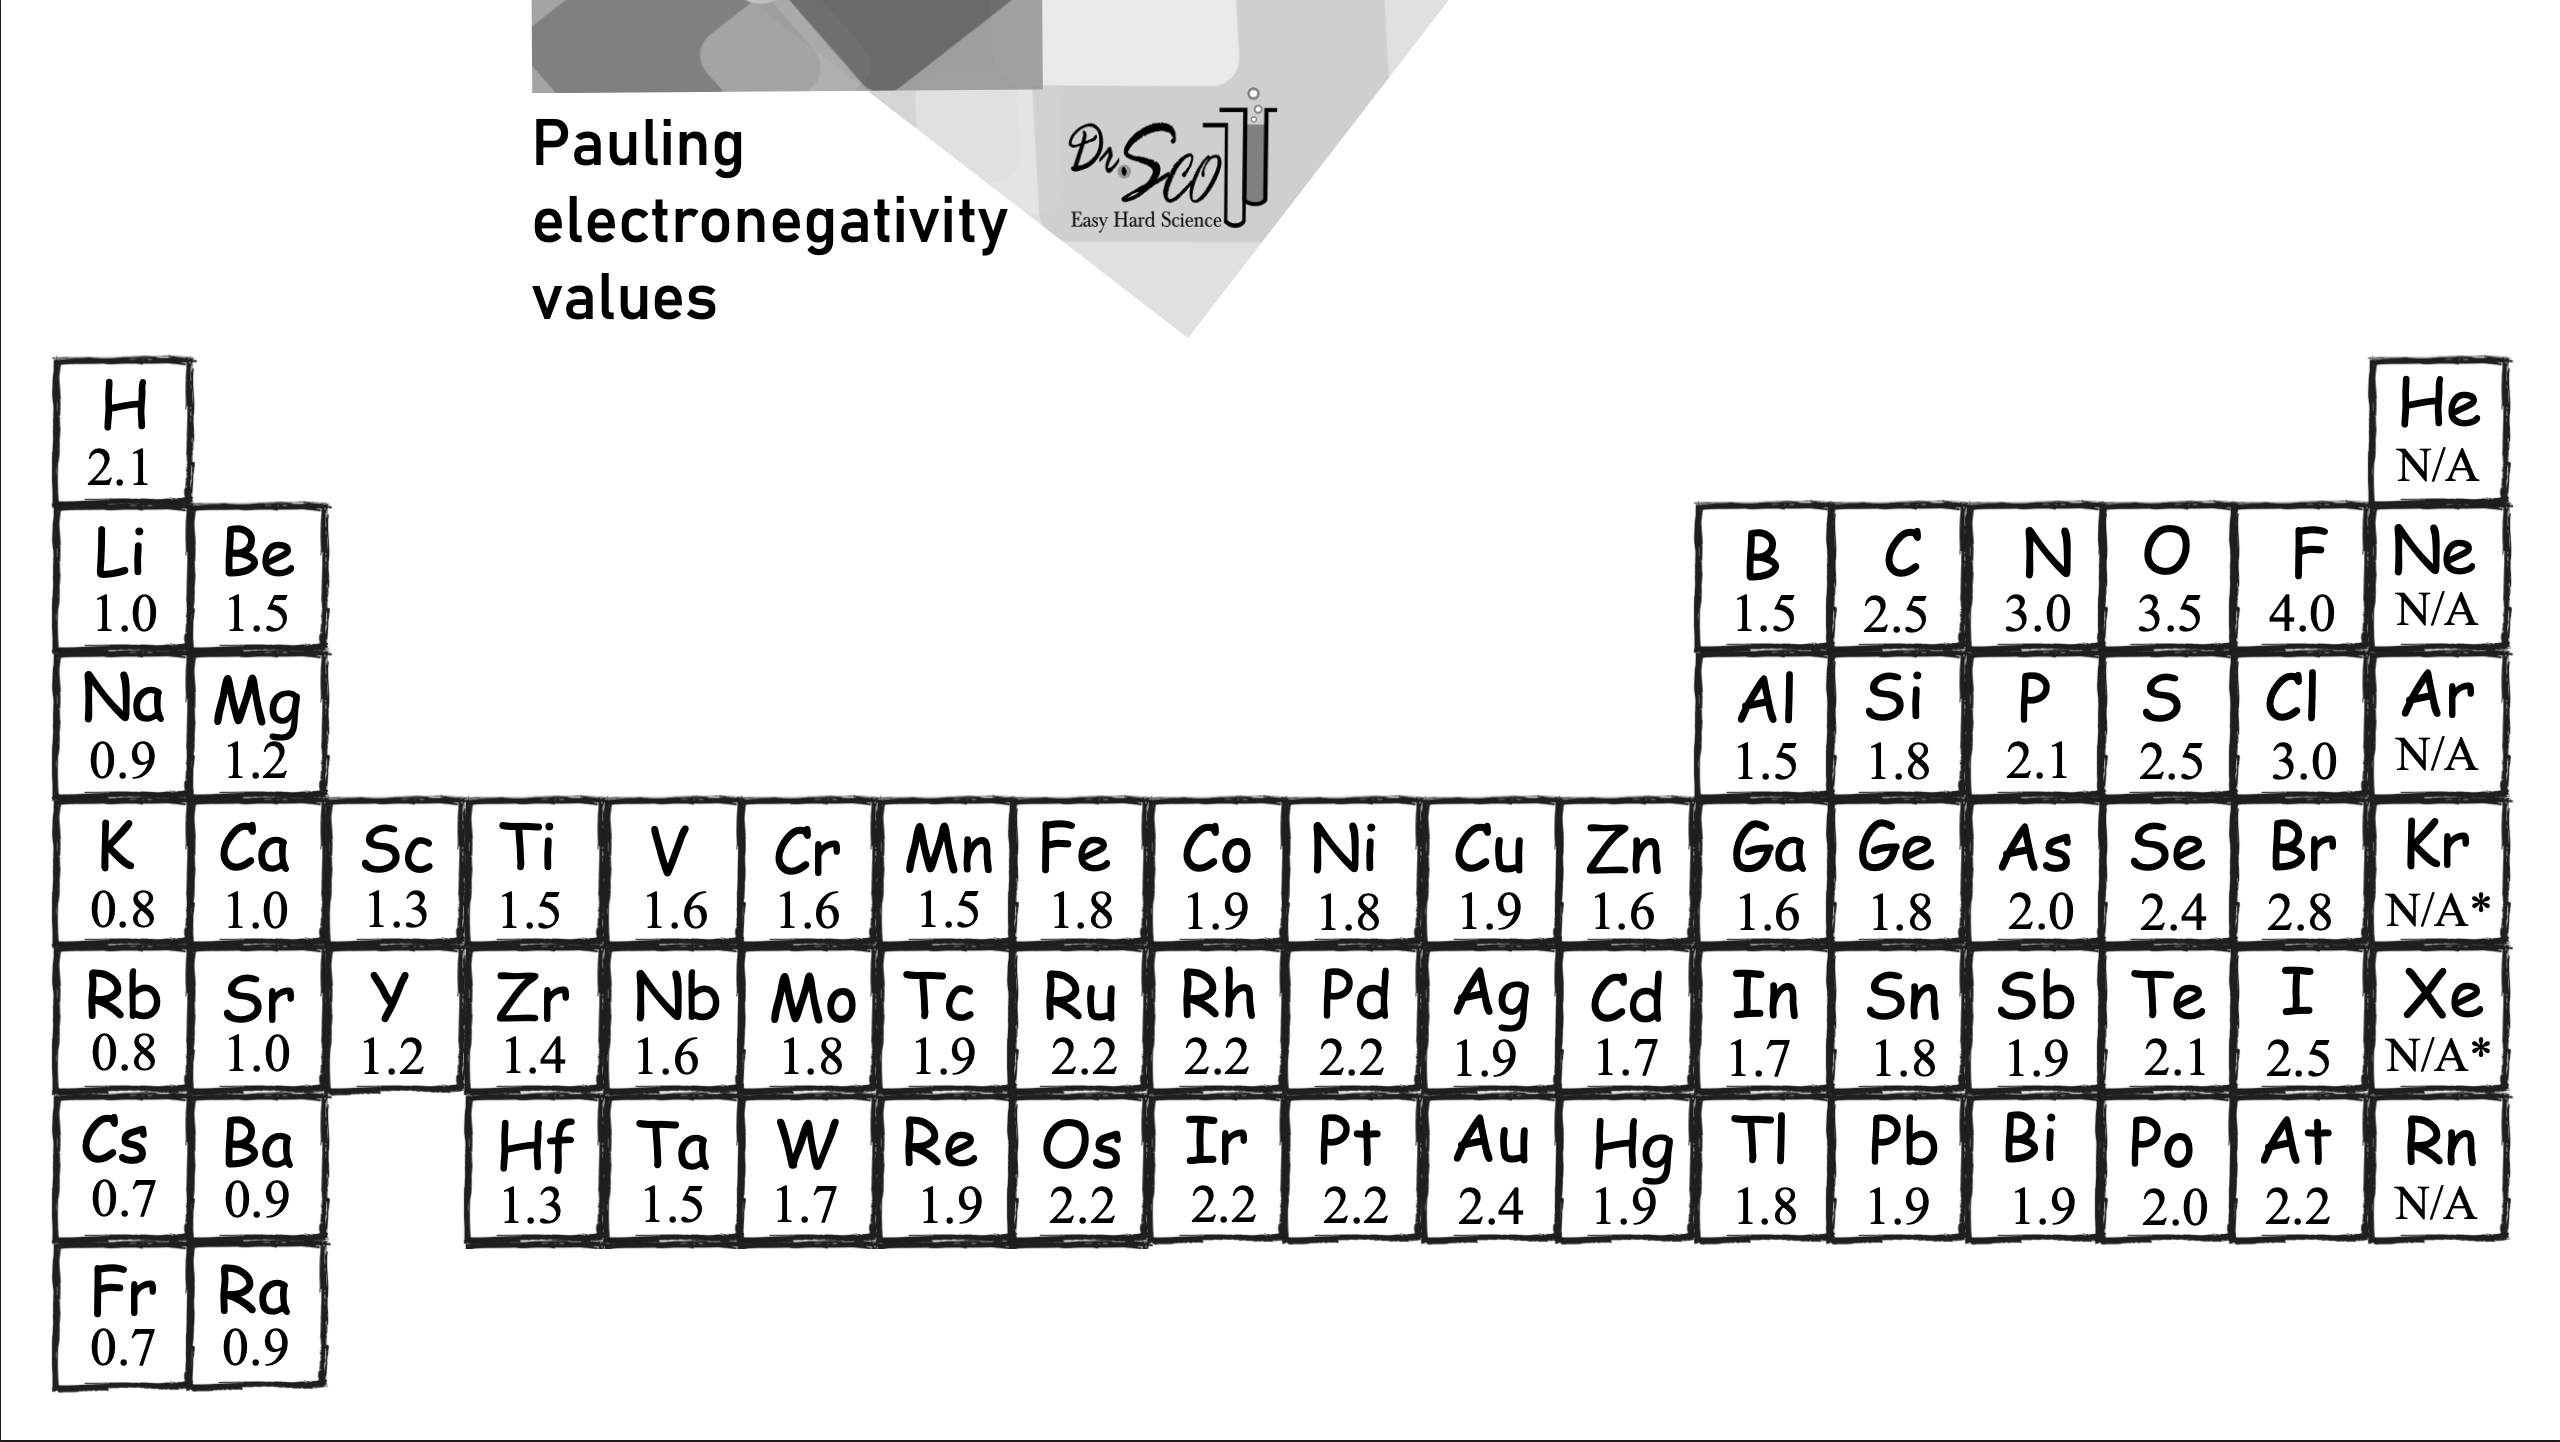
Question 3.1 Use the table above to determine the electronegativity value of gold (Au). Assign this value to it to the variable gold_EN.
gold_EN = ...
print(f"Based on the table above, gold's electronegativity value is roughly {gold_EN}")grader.check("q31")Electronegativity Difference
The difference in electronegativity (ΔEN) between two bonded atoms determines whether the bond is:
Non-Polar Covalent: Electrons are shared almost equally.
Polar Covalent: Electrons are unequally shared, creating partial charges.
Ionic: One atom completely transfers electrons to another.
The table below summarizes these bond types based on electronegativity difference ranges and provides an example for each type.
| Electronegativity Difference (ΔEN) | Bond Type | Example Bond | Explanation |
|---|---|---|---|
| ≤ 0.4 | Non-Polar Covalent | C-H (ΔEN = 0.4) | Electrons are shared almost equally, no significant charge separation. |
| > 0.4 and ≤ 1.7 | Polar Covalent | O-H (ΔEN = 1.4) | Electrons are unequally shared, creating partial positive and negative charges. |
| > 1.7 | Ionic | Na-Cl (ΔEN = 2.1) | One atom completely transfers electrons to another, forming charged ions. |
Question 3.2 For each of the following bonds, use Dr. Scott’s table to determine the electronegativity difference between the two elements involved. Then, assign that value to the corresponding variable as shown below:
Hint: Since electronegativity values must always be nonzero, you may find theabs function useful!
MgCl₂
TiO
S-F
N-O
C-S
Cl-O
Mg_Cl = ...
Ti_O =...
S_F = ...
N_O = ...
C_S = ...
Cl_O = ...grader.check("q32")Glycine C₂H₅NO₂
In this next part of the notebook, we’ll apply what we’ve learned about molecular structure and electronegativity differences to determine whether the Glycene molecule is polar or nonpolar.
To begin, let’s calculate the electronegativity differences for each of the bonds in the molecule!
Question 3.4. For each of the following bonds in glycine, calculate the electronegativity difference using Dr. Scott’s table. Remember to subtract the smaller electronegativity from the larger one so the result is positive.
en_diff_C_H = 2.5 - 2.1   #Carbon–Hydrogen bond
en_diff_C_O = 3.5 - 2.5   #Carbon–Oxygen bond
en_diff_N_H = 3.0 - 2.1   #Nitrogen–Hydrogen bond
en_diff_C_N = 3.0 - 2.5   #Carbon–Nitrogen bond

print(f"Electronegativity Differences in Glycine Bonds:")
print(f"  C–H bond: {en_diff_C_H}")
print(f"  C–O bond: {en_diff_C_O}")
print(f"  N–H bond: {en_diff_N_H}")
print(f" C–N bond: {en_diff_C_N}")grader.check("q34")Question 3.5 Based on the electronegativity differences you calculated, which of the following bonds in glycine are polar?
Only the C–H bonds
Only the C–O and N–H bonds
All of the listed bonds (C–H, C–O, N–H, and C–N)
The C-O, N-H, and C-N Bond
None of them
Set the variable answer to the number corresponding to your chosen option. For example, if you believe options 1 is correct, set answer = 1.
answer = ...grader.check("q35")Now that we have identified which of the bonds are polar, let’s try and determine the molecular shape of glycine! We will first use Rdkit to accomplish this.
Question 3.6. Fill in the ellipses below with the correct atomic numbers for each element in glycine. For example, in the carbon assignment statement, we used 6 because carbon is the sixth element on the periodic table! Use the comments to help guide your choices.
glycine = Chem.RWMol()
# Add atoms to the molecule
carbon = glycine.AddAtom(Chem.Atom(6))     # Carbon atom
hydrogen = ....AddAtom(Chem.Atom(1))   # Hydrogen atom
oxygen = glycine...(...)     # Oxygen atom
nitrogen = glycine.AddAtom(...) # Nitrogen atom grader.check("q36")Question 3.7. We haven’t added all the remaining atoms needed to complete the glycine molecule yet! Let’s go ahead and add the additional hydrogen, oxygen, and nitrogen atoms to our molecule below. Feel free to reference the code above for guidance on how to add atoms using Chem.Atom(). Remember, glycine contains multiple atoms of some elements!
# Add a second carbon atom
carbon2 = glycine.AddAtom(Chem.Atom(6))     # Carbon atom

# Add remaining hydrogen atoms (we've already added 1, so we add 4 more)
hydrogen2 = glycine.AddAtom(Chem.Atom(...))
hydrogen3 = ...
hydrogen4 = ...
hydrogen5 = ...

# Add a second oxygen atom (we've already added 1)
oxygen2 = ...grader.check("q37")Question 3.8. We’ve created the basic scaffolding for our glycine molecule—now it’s time to start adding the bonds between the atoms!
To help you get started, we’ve added the first carbon–nitrogen bond as an example. Using this format, add the remaining bonds to correctly connect all the atoms in glycine based on its structure.
Hint: Think about how the atoms are arranged in glycine’s structure (C₂H₅NO₂), including the backbone and side groups!
# Define bond type for single bonds
SINGLE = rdchem.BondType.SINGLE
DOUBLE = rdchem.BondType.DOUBLE

# Add bonds to complete the glycine structure

# Backbone: NH₂–CH₂–COOH
glycine.AddBond(nitrogen, hydrogen, SINGLE)      # N–H
glycine.AddBond(nitrogen, hydrogen2, SINGLE)     # N–H
glycine.AddBond(nitrogen, carbon, SINGLE)        # N–C (first carbon)

glycine.AddBond(..., hydrogen3, ...)       # C–H
glycine.AddBond(..., ..., ...)       # C–H
glycine.AddBond(..., carbon2, ...)         # C–C (connect to second carbon)

glycine.AddBond(..., ..., ...)         # C=O
glycine.AddBond(..., ..., ...)        # C–O
glycine.AddBond(..., ..., ...) # O–Hgrader.check("q38")Now that we have added all of our molecules, let’s try using RDkit to go about visualizing this in 2 dimensions.
Run the cell below.
# Convert to a normal molecule object
glycine = glycine.GetMol()

# Explicitly compute valence & add hydrogens
Chem.SanitizeMol(glycine)
glycine = Chem.AddHs(glycine)

# Generate 3D coordinates
AllChem.EmbedMolecule(glycine)

# Display the molecule
glycine
We’ve provided a visualization of glycine below — it should look similar to the one you generated above. Try to match the structure as closely as possible!

Since it’s a bit difficult to see the full shape of a molecule in 2D, let’s take things a step further and explore it in 3D!
Run the cell below. Please do not modify any of the lines—this cell has been pre-written to generate a specific visualization you’ll use to answer the following questions.
# Function to convert RDKit molecule to 3D (assuming it's defined)
glycine_3d = molecule_to_3d(glycine)

# Create a 3D viewer
view = pm.view(width=400, height=400)

# Load the molecule data
view.addModel(Chem.MolToMolBlock(glycine_3d), "mol")

# Apply enhanced styles
view.setStyle({
    "stick": {"radius": 0.2, "colorscheme": "Jmol"},  # Stick representation with colors
    "sphere": {"scale": 0.5, "colorscheme": "Jmol"},  # Spheres for atoms
})

# Add title label
view.addLabel(
    "Glycine (C₂H₅NO₂)",  # Title text
    {"position": {"x": 0, "y": 2, "z": 0}, "backgroundColor": "white", "fontColor": "black", "fontSize": 16}
)

# Adjust background and zoom
view.setBackgroundColor("white")
view.zoomTo()

# Show the visualization
view.show()
Perfect! We can now see a 3d representation of our molecule!
In the 3D model above, each atom is represented by a specific color using the Jmol color scheme:
Carbon (C) – Gray or black
Hydrogen (H) – White
Oxygen (O) – Red
Nitrogen (N) – Blue
Based on the visualization above, answer the following questions
Question 3.9. Glycine has multiple atoms and functional groups, so instead of a single overall molecular shape, we’ll focus on local geometries around key atoms.
What is the approximate shape around the central carbon atom (the one bonded to both the amine and carboxyl groups)?
What is the bond angle between the atoms attached to that central carbon?
Assign mol_shape to one of the following integers based on your shape selection
Linear
Trigonal planar
Tetrahedral
and assign angle to your estimated bond angle (in degrees)
view.show()mol_shape = ...
angle = ...mol_shape = ...
angle = ...Now that we’ve identified the local geometry of glycine, let’s consider the molecule’s overall polarity.
Question 3.10. Based on the electronegativity differences and the 3D structure you visualized, do you think glycine is a polar molecule? Assign the variable polar to True if you believe glycine is polar, or False if you think it is nonpolar
Hint: Consider whether the polar bonds in glycine are arranged symmetrically or asymmetrically
polar = ... grader.check("q310")Question 3.11. Explain your reasoning in the box below
Type your answer here, replacing this text.
Question 3.12. If you place glycine in water (H₂O) and hexane (C₆H₁₄), in which solvent will it dissolve better? Assign the number of your answer choice to the variable soluble.
Water, because water is polar.
Hexane, because hexane is nonpolar.
Neither, because glycine has both polar and nonpolar bonds.
Both, because polarity doesn’t affect solubility.
soluble = ... grader.check("q312")Question 3.10 Explain your reasoning in the box below
Congratulations!
Teddy 🧸 congratulates you on finishing the Bond Polarity notebook!

In this notebook, we
Learned how to build molecules like water, methane, and glycine using RDKit and explored their 2D and 3D structures
Investigated electronegativity differences between atoms to identify polar bonds
Used molecular geometry and visualizations to determine whether a molecule is polar or nonpolar
Applied concepts like bond angle and molecular symmetry to real-world examples
We hope you enjoyed learning how chemistry and computation come together to help us understand molecular behavior! If you’re curious to explore further, consider diving into how molecular polarity affects properties like solubility, boiling points, and biological function. You could even build larger biomolecules or simulate chemical reactions using similar tools. This is just the beginning of what’s possible when we combine computation with molecular science!
Submission
Make sure you have run all cells in your notebook in order before running the cell below, so that all images/graphs appear in the output. The cell below will generate a zip file for you to submit. Please save before exporting!
These are some submission instructions.
# Save your notebook first, then run this cell to export your submission.
grader.export(run_tests=True)